Action Manager – Ready-to-Go Application
Initiate actions and email/pager notifications automatically depending on the time of day in response to system, network, and application messages. (ORION 6.0 Build 2086 or above)
Download example - Already included in recent ORION packages
Details
The ORION Action Manager receives messages from a wide range of event sources and initiates user defined actions. Different actions can be taken based on configurable time windows during which individual messages are received. The original messages and the result of their actions can be automatically emailed/paged to you and are displayed in the EventViewer console.
The Action Manager can run local commands on Windows and Linux, run remote ssh and telnet commands, and run email-only actions.
Actions can be triggered by messages from local and remote Windows Event Logs, local and remote Windows and Linux text logs, email, Syslog, SNMP, and raw TCP/IP messages, as well as a built-in calendar scheduler.
ORION Action Manager is a Ready-To-Go Application for which you only have to specify the commands to execute, and the email server information. Certain optional remote data sources also require configuration of login accounts. This application is provided in “ORION Source Code” form, which means that you can easily customize its function in the ORION Manager user interface.
Examples
The following are just couple examples of what you can do with the ORION Action Manager:
- Restart web and database servers remotely when specific error messages are received.
- Be paged when a certain user logs in.
- Send Email requests to ORION from your mobile phone, and automatically receive system and application status messages in response, or automatically restart a server.
- Direct email notifications to different users based on predefined workday, after hours, and weekend/holiday schedules.
- Run programs and jobs at scheduled times during the day or week.
Here is an actual email message sent by the Action Manager. It’s Subject line shows the hostname, application, and logfile that the original message came from. The email shows that the original message was “TEST SSH”, and it shows the output of the remote SSH command that was executed.
Date: Wed, 18 Apr 2007 14:05:04 -0700 (PDT)
To: <test@eventgnosis.com>
Subject: ACTION ALERT:  HOST: vm-xp1 APPLICATION: HelloWorldLog LOG: C:\Program Files\EventGnosis\ecs\HelloWorld.txt

The following message has been received by ORION and automatically forwarded to you:

MESSAGE:    TEST SSH
ACTION RESULT:
Filesystem           1K-blocks      Used Available Use% Mounted on
/dev/hda2              2063536   1676688    282024  86% /
/dev/hda1               101089      9195     86675  10% /boot
none                    196172         0    196172   0% /dev/shm
HOW TO RUN THE APPLICATION
We assume that you have installed he ORION Application Manager correctly or started it in the Application Wizard after logging into the ORION Manager, the first time.
Basic Configurations
Configuring Command Actions
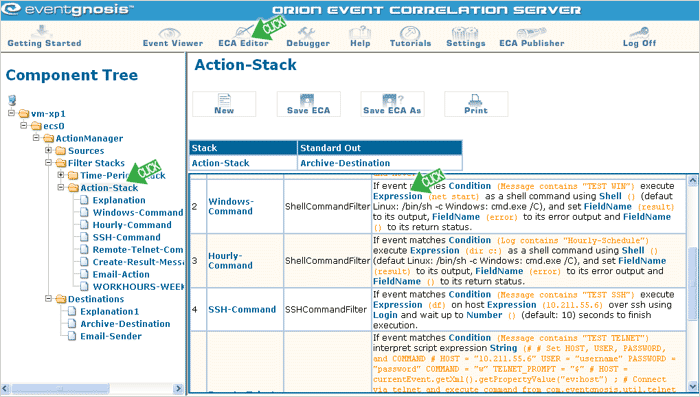
If you click on ECA Editor, the Action-Stack, and scroll past the Explanation, you should see the following screen:
Both ShellCommand Filters execute the commands specified in the Expression parameter on the local host on which ORION is installed. You can change the command string by clicking on the blue “Expression” link. The Condition determines when the command is executed. Condition can match for the contents of any field in an event.
In this case, the “Message” field is tested whether it contains the sub-string “TEST WIN” (case insensitive). If a message is received which contains the “TEST WIN” string, then the “net start” command is executed, which displays all the Windows Services that can be controlled with the “net start” command. You can change the condition and the command to anything you want, but you may want to follow the test instructions below to see how it works first, before you start customizing.
The SSH Command filter executes commands remotely. Hence it requires you to also specify the hostname or IP address of the host on which to execute the command, and the “Login” information, in addition to the condition and the command.
You can define any number of command actions by simply copying and pasting the Shell Command or SSH Command Filters shown here. Right click on the Filter name in the Component Tree on the left, and select Copy and Paste. Make sure that you “Move Up” any command filters above the “Create-Result-Message” filter, or your email messages won’t show the output of your command filters.
Whenever, you make changes hit the “Save ECA” button. Make your changes active by restarting ORION - Click on your hostname in the Component Tree, and select restart. For more information on how to work with ORION applications, you may want to glance at the Hello World tutorial.
Configuring Mail Sending
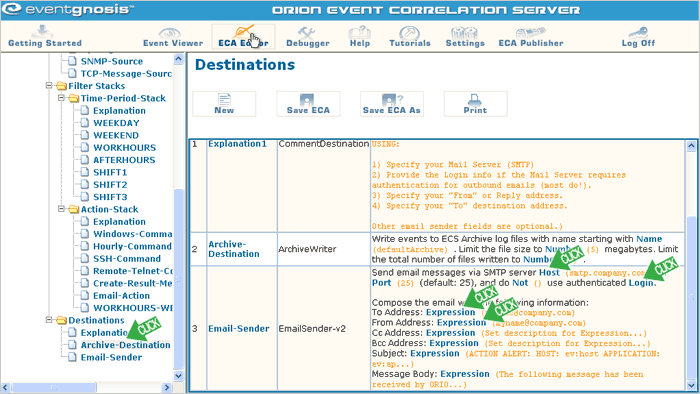
If you want to receive email messages of certain events and see the results of actions, you need to specify an email (SMTP) server. Click on Destinations, and scroll to the Email-Sender.
Enter your outbound SMTP email server in the Host field, and provide your mail server login information for authentication during email sending. You should also specify correct email addresses for the To and From Address fields.
Again, hit “Save ECA” and restart ORION as described above.
Running Test Actions
For this test run, we assume that you are running on Windows and that you installed ORION in its default location (C:\Program Files\EventGnosis\ecs). ORION works just as well on Linux (/usr/eventgnosis/ecs), Except Linux hosts cannot read Windows Event Logs directly.
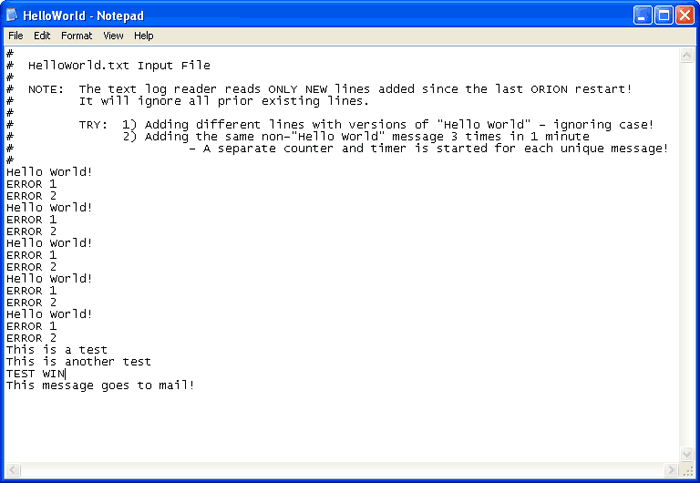
Open this file (C:\Program Files\EventGnosis\ecs\HelloWorld.txt) in Notepad, add a line with the words “TEST WIN” at the end of the file, and another line with “This message goes to mail!”. Save the file.
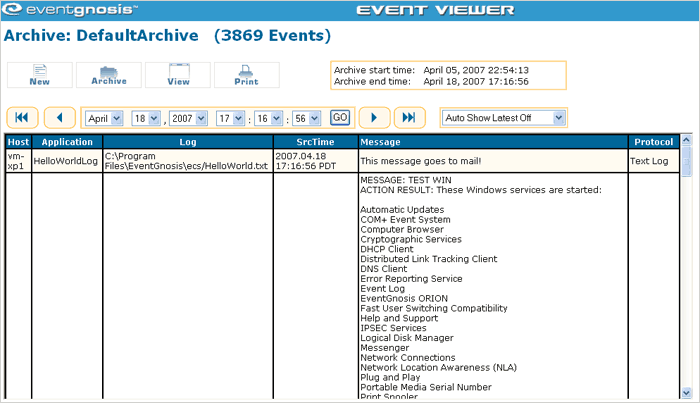
Click on the “Event Viewer” button, and you should see a screen that looks like this. If you see other Windows related messages, you may need to scroll a little bit, as ORION is reading your local Windows Event Logs, also.
The EventViewer shows the most recent events on top. The top event shows our “This message goes to mail!”. The second event can be really long, depending on your system. It shows the original line that you wrote to the HelloWorld.txt file “TEST WIN”, followed by a long output for the Windows “net stat” command.
If you configured your Email-Sender above, correctly, then you should also find these two email messages in your inbox.
To: <test@eventgnosis.com>
Subject: ACTION ALERT:  HOST: vm-xp1 APPLICATION: HelloWorldLog LOG: C:\Program Files\EventGnosis\ecs\HelloWorld.txt

The following message has been received by ORION and automatically forwarded to you:

This message goes to mail!
To: <test@eventgnosis.com>
Subject: ACTION ALERT:  HOST: vm-xp1 APPLICATION: HelloWorldLog LOG: C:\Program Files\EventGnosis\ecs\HelloWorld.txt


The following message has been received by ORION and automatically forwarded to you:

MESSAGE:    TEST WIN
ACTION RESULT:  These Windows services are started:

   Automatic Updates
   COM+ Event System
   Computer Browser
   Cryptographic Services
   DHCP Client
   Distributed Link Tracking Client
   ...
   Windows Time
   Wireless Zero Configuration
   Workstation

The command completed successfully.
If you didn’t not receive email messages, make sure that you saved the ECA application and restarted ORION. Verify your server, address, and login information in the Email-Sender. If you see errors and warnings at the bottom of your screen, click on them. You will get errors and warnings for sources, filters, and destinations that are not fully configured, which is normal. However, you shouldn’t get errors from the Email-Sender if you specified the correct host and login information.
Advanced Configurations
Email Notifications for Specific Messages
The ORION Action Manager also let’s you just forward certain events to email without executing action commands. All you have to do is forward a copy of the event to the Email-Sender destination. The condition determines which messages to send to email.
Timed Actions and Email
All events first pass through the Time-Period-Stack, where they are tagged with the ev:time.period field which contains a number of keywords depending on the time of day that the event was received. Here are the predefined time period keywords:
WEEKDAY 	MON-FRI
WEEKEND 	SAT-SUN
WORKHOURS 	8:00-17:59:59
AFTERHOURS 	NOT WORKHOURS
SHIFT1 		8:00-15:59:59
SHIFT2 		15:00-23:59:59
SHIFT3 		0:00- 7:59:59
You can limit the time periods in which actions are executed and emails are sent by including time periods in the Condition of action filters. You can also combine multiple time periods. For example, if you require that ev:time.period contains “WEEKDAY” AND ev:time.period contains “WORKHOURS”, then the action would only be executed Mon-Fri between 8am-6pm.
Configuring New Time Windows
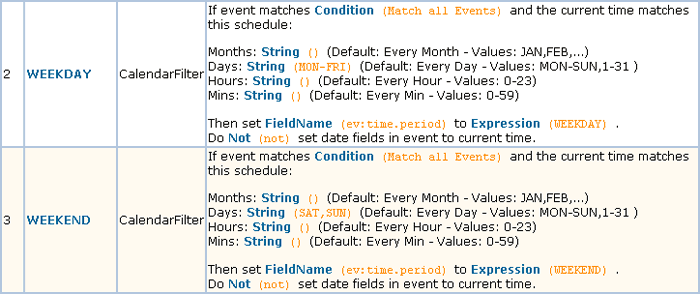
The time windows are actually defined in the filters of the Time-Period-Stack, and can be customized by you.
As you can see, these Calendar Filters add the words WEEKEND or WEEKDAY to the ev:time.period field depending on the content of the Month, Day, Hour, and Minute values.
If you don’t enter a specific value or range, then all values will match, otherwise it will be limited only to the values specified for that field. For example, if you need to alert on certain processes that only run during Midnight and 6am (05:59:59) on the first day of a month, you could set the Calendar Filter to the following values:
Month:    <empty>   (for all months from Jan-Dec)
Day:      1         (for first day of the month)
Hours:    0-5       (for midnight through 5am)
Minutes:  <empty>   (for the full hour from 0-59)
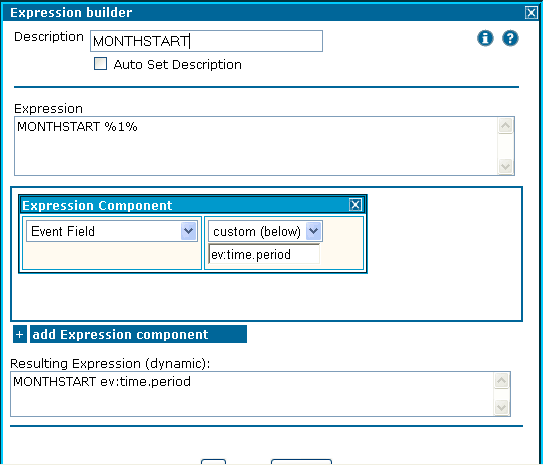
You can give this time period a name, for example “MONTHSTART”, by adding it in the expression of the Calendar Filter.
Note: Make sure you don’t remove the %1% or it will overwrite and not add to the time window names of other Calendar Filters. It’s best to copy and paste the Calendar Filters.
Recurring Scheduler Actions
The Action Manager can also perform actions on specific schedules. This is accomplished with the Scheduler Source which issues a scheduler event at certain times, and Command Filters which trigger only on events created by that specific Scheduler Source.
Here is the Scheduler Source named “Hourly-Schedule”:
The ‘0’ in the Minutes field means that it will issue one event during the first minute of every hour. The scheduler event will have the given name of the Scheduler Source “Hourly-Schedule” in its “Log” field.
If we configure the above Condition with the name of the Scheduler Source in a Command Filter, then the command will be executed at the beginning of each hour.
This is what the resulting event would look like in the Event Viewer:
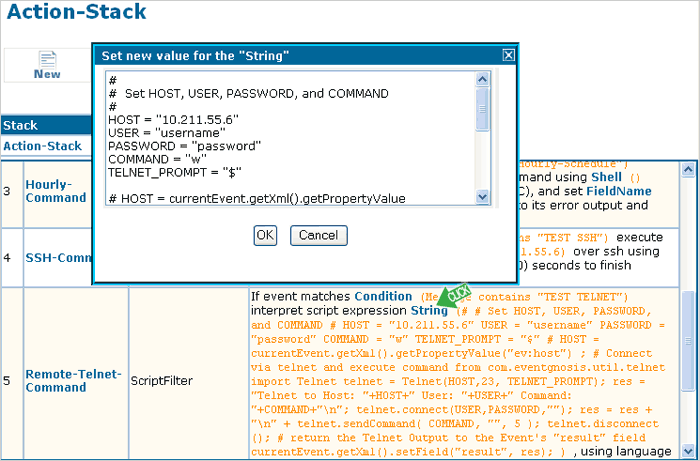
Telnet Commands using the Script Filter
Sometimes appliances, switches, and routers support only telnet connections instead of the more secure SSH connections. We have included an example of a simple telnet connection using a Script Filter with a simple Jython (Python) script. It goes beyond the scope of this tutorial to explain scripting in ORION, but the example has been configured, such that you only have to specify the Host, Username, Password, and Command in the “Remote-Telnet-Command” script filter.
Trying the other protocols
The examples above just demonstrate triggering actions by writing messages into a local text log file. Here are ways to send or test other protocols:
SNMP
Run the EV_HOME/scripts/sendtrap1 script, which sends an SNMP message to ORION on the localhost with the work “test” in its “varbindings”. This should automatically forward the SNMP trap to email.
Syslog
Send a syslog message with the words “test” or “test win” to your ORION host. It will trigger the appropriate emails and actions. If you have syslog remote logging already configured on your Linux/Unix systems and they are forwarding syslog traffic to the ORION host, then the “logger test win” command may do the job. Otherwise, download one of the many free syslog generators from the web.
Local and Remote Windows Event Logs
It can be somewhat tricky to generate test Windows Event Log messages on demand. If you are receiving Windows Event Logs messages in your Event Viewer, pick a key word from one of the regularly recurring messages (e.g. logins), and place it into one of the Command Filter Conditions. Whenever, the message is received the command will be executed.
Remote Linux Text Logs
Configure the connection information in the Remote-Linux-Text-Source. Any events written to the /var/log/messages file on that remote host should appear in your Event Viewer. Run “logger test win” on your remote host and it will log “test win” to the /var/log/messages file, which will trigger actions in the Action Manager.
Receiving Emails and Email Requests
Configure your “Email-Source”, and send emails to that email account with the words “test win” somewhere in the email body. You should see the original email text with the action in the Event Viewer. Make sure you use different email accounts for incoming and outgoing mail!
Try creating an action that is triggered by an incoming email, which forwards the results back to you by outgoing email. This allows remote on-demand monitoring and actions via email.
Remote Windows Text logs
Share the remote log file and mount it on your ORION host. Here you treat it just like another local text file.
Raw TCP/IP Messages
The “TCP-Message-Source” can process several event message formats (ECS TCP Event Receiver). A single line of text is simply converted into an event where that line of text becomes the Message field in the event. It is easy to open a TCP/IP socket in many scripting and programming languages and to write text into the socket.
However, a simple way to test it manually is to use the following telnet command string.
telnet <ORION Host> 25000Make sure you don’t have firewalls blocking the connection. Some telnet programs won’t echo characters back, so you may have to type blindly. Here is an example telnet session:
$ telnet 10.211.55.4 25000
Trying 10.211.55.4...
Connected to 10.211.55.4.
Escape character is '^]'.
test win
mail this to me
^]
telnet> quit
Connection closed.
This telnet session created two events “test win” and “mail this to me”. “test win” executed the windows command action, and “mail this to me” was sent out in a email message because it included the keywork “mail” in its message.
Other Advanced Configurations
- Create different email distribution lists by creating multiple email senders, and using the Copy Event Filters in the “Action-Stack” to forward specific messages to certain email groups.
- Change the formatting of Event Viewer and email messages by changing the Expression in the “Create-Result-Message” filter in the Action Stack.
INSTALLATION
This application is pre-installed in your most recent ORION download, and can be run by simply selecting it in Application Wizard. It requires ORION 6.0 Build 2086 or above. You may also follow the standard installation procedure for examples for manual installation. If this is your first time using an ORION application, we suggest that you familiarize yourself with the basic screens and server operation described in the Hello World tutorial.
KEY SKILLS DEMONSTRATED
- Reading and testing a wide range of local and remote messaging protocols
- Sending email messages
- Executing shell, SSH, and telnet commands
- Processing events based on time-of-day or day-of-week
- Scheduling calendar based actions
FILES
- EV_HOME/config/ActionManagerV1.0.xml – Reads many message protocols, executes command actions, and forwards results to email.
INPUT PROTOCOLS
ECS TCP Event Receiver, Email Receiver, SNMP Receiver, Syslog Receiver, TextLog Receiver, Windows Event Log Reader, Scheduler Source, Remote Unix TextLog Receiver, Remote Windows Log Reader
OUTPUT PROTOCOLS
SUMMARY
COMPLEXITY: Moderate
ORION VERSION: 6.0 build 2086 or above
KEY WORDS: AUTOMATIC ACTIONS, TIME BASED ACTIONS, SCHEDULED ACTIONS, ECS TCP Event Receiver, Email Receiver, SNMP Receiver, TextLog Receiver, Windows Event Log Reader, Scheduler Source, Remote Unix TextLog Receiver, Email Sender, SSH, TELNET, SHELL COMMANDS, EMAIL SENDING, EMAIL RECEIVING, Calendar Filter, READY-TO-GO, WINDOWS EVENT LOGS, SYSLOG, Remote Windows Log Reader, Syslog Receiver, Archive Writer
